Floor Bunding Installation: Doing it right, the first time
Floor bunding creates a barrier to spills within your workplace, preventing them from escaping a given area. It provides reliable containment, but still allows for the free movement of workshop vehicles and heavy wheels, which simply roll straight over its low walls.
A standard in thousands of workshops around Australia, floor bunding ensures that areas of higher likelihood for spills are offered a failsafe, permanently deployed.
But this item will not function as designed unless it is installed properly, and ensuring that it is sitting flat, straight, and true is key to ensuring that it will be both impenetrable, and easily worked with. At Ecospill, our Durabund floor bunding is among the finest on the market, so ensure you lay it down properly by following these key points.
Preparation Rules
First and foremost, the floor must be clean, flat, and free of debris or dust. This doesn’t stop at just your mop – it includes the removal of any grease or old paint that is stuck to the concrete. Otherwise, the all-important adhesive bonding on the bottom of the bunding may be compromised.
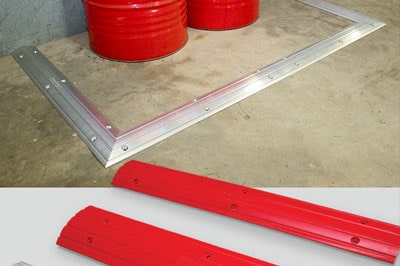
Cut to Size
After marking out the route of your bunding, use a fine-tooth electrical saw, and cut it to the prescribed length. Done properly, there are no seams between the cuts, and the entirety of the spill-prone region is surrounded. Should you require additional strength for your bunding, this is when you drill pilot holes for Dynabolts. Be sure to clean up any dust that may result before proceeding.
Apply the Bond
First, clean the bottom of the Durabund with the MEK Durabund cleaner, using a clean cloth or tissue, changing it frequently. Once it is clean, apply a continuous bead of adhesive down either side, ensuring that they line up with the preformed anchor holes, with a third bead of adhesive zig-zagging between the other two. Now, lay the Durabund against the marked straight line, and apply even pressure, for the entire length of the Durabund.
Your spacers will be inserted in to the joints now, to allow for expansion. Remove them, and smear Sikaflex over the joint to ensure the seal, without filling the joint. Now, install any Dynabolts, and you are done.
Ensure that you wait 24 hours, for the bond to be as strong as possible, before subjecting it to stress. Done properly, Durabund and Ecospill provide a hard-wearing, toughened barrier to any spills that may occur in your workshop, allowing you the chance to clean them up before they escape.